This concise study resource provides step-by-step instructions for how to insert an IV, along with tips and tricks to ensure success. Download and print this PDF document to use as a study aid, helping you memorize the most important points about the topic of IV insertion. With this guide, you’ll be well on your way to becoming a pro at IV insertion and providing top-notch care for your patients.
“IV” is short for “intravenous,” referring to intravenous therapy, which is the administration of fluids, medication, or nutrients directly into a client’s vein.
There are several types of IV administration:
IV drip: This is the most common method of IV administration. In this method, a small tube (catheter) is inserted into a vein, often in the arm or hand, and connected to a bag of fluid.
IV push: This method involves injecting a small amount of medication directly into the bloodstream through an existing IV line or port.
IV infusion pump: An infusion pump is a device that regulates the amount and speed of IV medication or fluid.
What are IVs used for?
IVs are used in a wide variety of situations, such as:
To keep clients hydrated by providing fluids during surgery or illness
To deliver medication directly into the bloodstream (allows it to take effect more quickly)
To provide nutrition to clients who can’t eat or absorb nutrients through their digestive system
To transfuse blood or blood products
What are the steps for starting an IV?
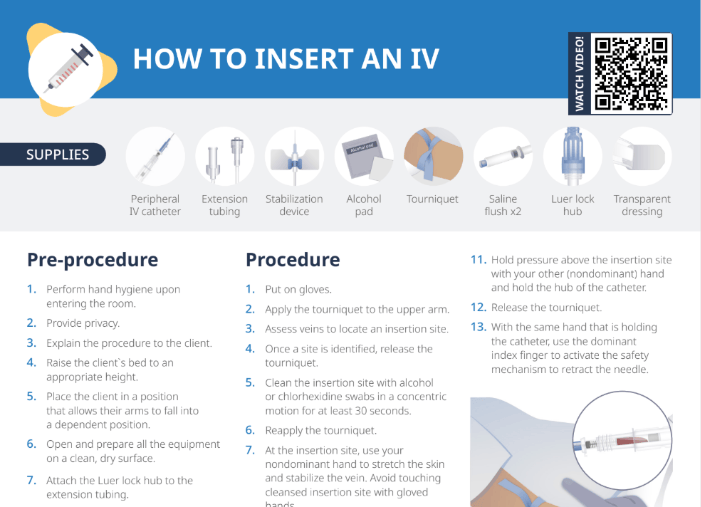
Perform hand hygiene upon entering the room, provide privacy, and explain the procedure to the client.
Raise the client’s bed to an appropriate height and place the client in a position that allows the arms to fall into a dependent position.
Open and prepare all equipment on a clean, dry surface (attach Luer lock hub to extension tubing, attach saline flush, prime extension tubing).
Apply a tourniquet to the upper arm and assess veins to locate an insertion site (wear gloves).
Once a site is identified, release the tourniquet and clean the insertion site with alcohol for at least 30 seconds.
At the insertion site, use the nondominant hand to stretch the skin and stabilize the vein.
Place the IV catheter on top of the vein at a 10- to 15-degree angle, bevel side up, and puncture both skin and vein wall while watching for blood flashback in catheter.
Using the dominant index finger, gently push the catheter forward and click the safety mechanism to retract the needle.
To locate a vein for insertion, apply a tourniquet to the upper arm and assess veins. Release the tourniquet once a site is identified.
What supplies are needed for starting an IV?
Supplies needed for an IV insertion include
Alcohol pads
Tourniquet
Saline flush x2
Luer lock hub
Transparent dressing
Gauze dressing
Peripheral IV catheter
Extension tubing
Stabilization device
What angle should the IV catheter be placed at during insertion?
The IV catheter should be placed on top of the vein at a 10- to 15-degree angle during insertion, with the bevel side up.
How are linens protected during an IV insertion?
A clean absorbent pad can be placed under the patient’s IV site to protect linens from blood during an IV insertion.
What should you do after visualizing blood return during an IV insertion?
After visualizing blood return, slowly inject saline flush into the extension tubing and through the catheter, clamp the catheter, and remove saline flush.
What should you do after completing an IV insertion?
After completing an IV insertion, attach primed extension tubing to catheter hub, apply dressing, assess for blood return by drawing back on the plunger of the attached saline flush, inject saline flush and remove.
How to ensure client comfort during an IV insertion
You can improve client comfort during an IV insertion by providing privacy and an explanation of the procedure beforehand. Allow time for client questions. Demonstrate caring and patience for individuals’ concerns/needs. Other measures that may be appropriate include: