>

>

How to Change an Ostomy Bag

Nursing Knowledge

How to Change an Ostomy Bag

Ostomy bags are a common medical device used to help individuals who have undergone surgery to remove or bypass a portion of their digestive or urinary system. These bags are designed to collect waste and fluids that would otherwise be eliminated through the rectum or bladder. It is important for a nurse to know the proper procedure on how to change an ostomy bag to prevent complications, such as skin irritation and infection. This guide provides step-by-step instructions on how to change an ostomy bag, including the necessary supplies and precautions that should be taken during the procedure.
Last updated: December 4, 2023

Table of contents

What is an ostomy bag? 

An ostomy bag, also known as a stoma bag or pouch, is a prosthetic medical device that collects waste from a surgically created opening (stoma) from the digestive or urinary system. The bag adheres to the skin around the stoma and is typically disposable.

What is an ostomy, and what is a stoma? 

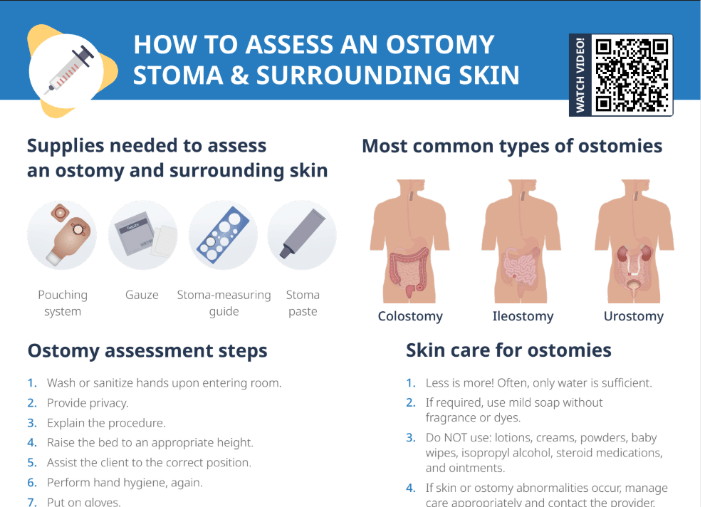
An ostomy is a surgical opening to allow stool or urine to leave the body. A stoma is an opening in the abdomen. Ostomy and stoma are interchangeable words. Ostomies can be temporary or permanent.

What are the most common types of ostomies? 

  • Colostomy (from the colon)
  • Ileostomy (from the ileum)
  • Urostomy (from the urinary system)

What supplies are needed to change an ostomy pouch?

  • Pouching system
  • Gauze
  • Stoma-measuring guide
  • Stoma paste

How to prepare an ostomy pouch change

  1. Wash/sanitize hands upon entering room 
  2. Provide privacy and explain the procedure
  3. Raise bed to appropriate height and assist client to correct position
  4. Don clean gloves
  5. Empty contents of ostomy pouch and dispose according to facility policy (change gloves if soiled)
  6. Remove the old or soiled ostomy and dispose according to facility policy (change gloves if soiled)

How to change an ostomy bag (step-by-step)

  1. Measure the stoma with the stoma measuring guide.
  2. For a one-piece pouch, select the size that matches the stoma. For a two-piece pouch, cut a hole slightly bigger than the stoma size into the adhesive back.
  3. Gently wipe the stoma and wash the peristomal skin with wet gauze (or soal and water) and allow it to dry. Place a dry piece of gauze over stoma to prevent release of contents onto skin.
  4. Apply the stoma paste if indicated.
  5. Apply the one-piece ostomy pouch system, or apply the adhesive back of the two-piece system followed by application of the pouch to the adhesive back.
  6. Ensure the ostomy closure clamp is applied and secure.
  7. Document reason for ostomy change, condition of skin, and client teaching or participation in procedure.

How often should an ostomy bag be emptied? 

An ostomy bag should be emptied when it is about one-third to one-half full. This is typically several times a day, but the frequency can vary based on individual factors like diet and the type of ostomy.

How often should an ostomy bag be changed? 

The frequency of changing an ostomy bag varies based on the type of ostomy and individual needs, but generally, a drainable ostomy pouch is changed every 2–4 days. Pre-cut, closed ostomy bags are usually changed daily. 

How to keep an ostomy bag from leaking 

To prevent leakage, ensure a good fit of the skin barrier (the part that sticks to the skin and protects it). This often involves correctly cutting the hole to match the size and shape of the stoma. Use accessory products such as paste or rings for a better seal, and change the bag before it’s too full to prevent undue pressure on the seal.

Always change the bag immediately if there’s any sign of irritation or leakage.

FREE CHEAT SHEET

How to Change an Ostomy Bag

Free Download

Nursing Cheat Sheet

Ostomy bag care 101: what you need to know

Master the topic with a unique study combination of a concise summary paired with video lectures. 

User Reviews