Correctly conducting a fingerstick blood glucose test is an essential skill for every nurse. Fingerstick blood glucose measurements offer important insights into a client’s blood sugar levels, aiding in diagnosing and managing diseases like diabetes. Keep reading for a guide on pre-procedure preparation, the procedure itself, post-procedure considerations, and clinical advice on handling low (hypoglycemia) and high (hyperglycemia) blood sugar levels.
A blood glucose fingerstick measurement is a procedure that involves pricking the finger with a lancet to obtain a small sample of blood for testing glucose levels.
What are indications for blood glucose testing?
The most common usage of blood glucose testing is managing and monitoring the blood sugar levels of clients with diabetes. Frequent monitoring can prevent both short-term complications (like diabetic ketoacidosis or hypoglycemic unawareness) and long-term health problems (like heart disease or kidney disease).
Other situations where blood glucose tests are also appropriate include:
Diagnosing diabetes (fasting blood glucose test)
Clients that are experiencing symptoms of high or low blood sugar
Screening for gestational diabetes during pregnancy
Clients with critical illness that can cause blood sugar fluctuations or postoperatively
What should you do after performing a fingerstick for blood glucose assessment?
After performing a fingerstick for blood glucose assessment, you should remove the test strip from the glucometer, dispose of used supplies in an appropriate waste-basket or sharps container, remove gloves and perform hand hygiene, and document the procedure and results.
How to get more blood from a fingerstick
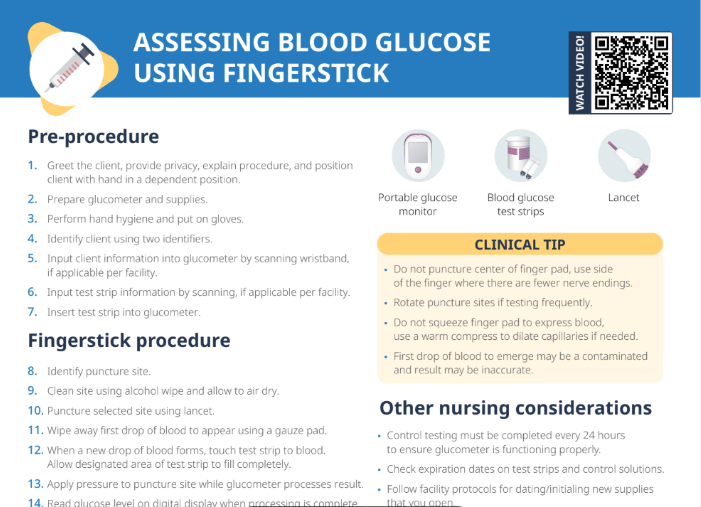
You should not squeeze the finger pad to express more blood. Instead, use a warm compress to dilate capillaries, if needed.
Clinical nursing tips for fingerstick procedures
Do not puncture the center of the finger pad. Using the side of the finger where there are fewer nerve endings is less painful for the client.
Use the client’s non-dominant hand to reduce discomfort.
Rotate puncture sites if testing frequently.
The first drop of blood to emerge may be contaminated and the result may be inaccurate.
Control testing must be completed every 24 hours to ensure glucometer is functioning properly.
Check expiration dates on test strips and control solutions.
Follow facility protocols for dating/initialing new supplies that you open
Avoid spreading infection by following facility protocols for cleaning of glucometer and other equipment after testing each client.
Know your facility’s cut-offs for critical glucose levels. Notify provider of abnormal results and initiate treatment per protocol if a client is symptomatic.
What are the signs and symptoms of hypoglycemia?
The signs and symptoms of hypoglycemia include anxiety/confusion, tingling, diaphoresis, tachycardia, and tremors.
If a client is symptomatic with hypoglycemia, a simple carb (juice) should be given to a conscious client, and IM glucagon should be given to a client unable to take PO.
What are the signs and symptoms of hyperglycemia?
The signs and symptoms of hyperglycemia include fatigue, blurred vision, nausea and vomiting, thirst, and fruity breath.
If a client is symptomatic with hyperglycemia, IV fluid resuscitation and IV insulin should be initiated.
What are normal blood glucose levels?
Normal fasting blood glucose levels are usually between 70 and 100 mg/dL. Postprandial (after meal) levels should be less than 140 mg/dL. It’s critical to report readings below 70 mg/dL (hypoglycemia) or above 180 mg/dL (hyperglycemia), or per your facility’s protocols.