Sutures are a common method of wound closure in clinical practice. They hold the edges of a wound together to promote healing and prevent infection. As a nurse, it is important to know how to properly remove sutures to ensure that the wound heals properly and to prevent complications. Keep reading for a step-by-step guide on how to safely and effectively remove sutures from a client.
Sutures are medical devices used to hold body tissues together after an injury or surgery (“stitches”). They facilitate the healing process by keeping the edges of the wound together.
Types of sutures:
Absorbable sutures (do not require removal, broken down by body over time)
Non-absorbable sutures (nylon or silk, need to be removed)
Tip: Spitting sutures refer to when a suture used in a wound works its way to the surface of the skin and becomes visible or palpable, which may be accompanied by infection of inflammation.
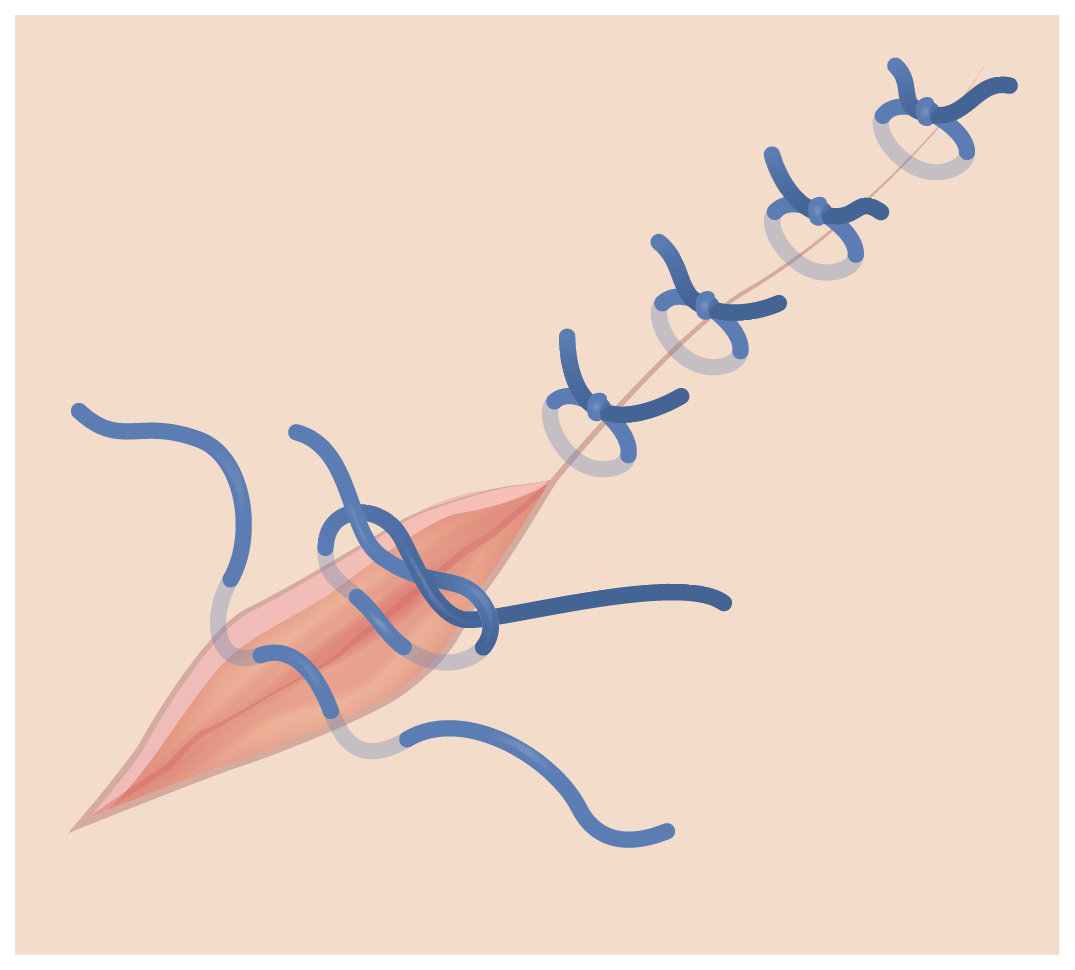
Simple interrupted suture
Image by Lecturio.
When to remove sutures
Generally, nurses will follow the recommendations of the surgeon or provider who placed the sutures. Close examination of the wound will guide the decision.
A general rough estimate for when sutures typically are removed in different areas:
Face: 3–5 days
Scalp: 7–10 days
Neck: 3–7 days
Chest and abdomen: 7–10 days
Arms and legs: 7–14 days
Joint areas: 10–14 days
Back: 10–14 days
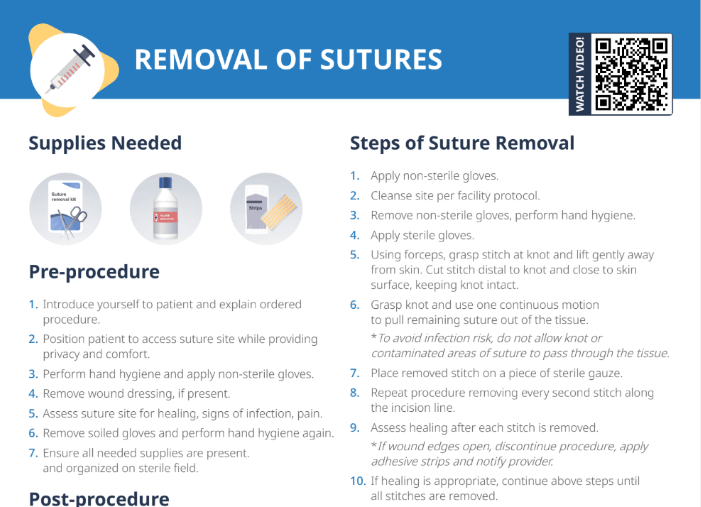
What supplies are needed for suture removal?
Suture removal kit
Saline solution
Adhesive strips
Gloves (or other PPE)
Suture removal kits typically contain suture scissors, forceps or tweezers, gauze pads, disposable gloves, and antiseptic solution for cleaning the wound area.
How to remove sutures step-by-step
Pre-procedure
Introduce yourself to client and explain ordered procedure.
Position client to access suture site while providing privacy and comfort.
Perform hand hygiene and apply non-sterile gloves.
Remove wound dressing, if present.
Assess suture site for healing, signs of infection, pain.
Remove soiled gloves and perform hand hygiene again.
Ensure all needed supplies are present and organized on sterile field.
Procedure steps
Apply non-sterile gloves.
Cleanse site per facility protocol.
Remove non-sterile gloves, perform hand hygiene.
Apply sterile gloves.
Using forceps, grasp stitch at knot and lift gently away from skin. Cut stitch distal to knot and close to skin surface, keeping knot intact.
Grasp knot and use one continuous motion to pull remaining suture out of the tissue. *To avoid infection risk, do not allow knot or contaminated areas of suture to pass through the tissue.
Place removed stitch on a piece of sterile gauze.
Repeat procedure removing every second stitch along the incision line.
Assess healing after each stitch is removed.
If healing is appropriate, continue above steps until all stitches are removed.
Post-procedure
Gently cleanse incision site.
Apply adhesive strips if gaps are present in the incision (notify the provider).
Apply a dressing if needed or as ordered.
Properly dispose of removed sutures and supplies.
Answer client questions and provide follow up instructions as ordered.