Playlist
Show Playlist
Hide Playlist
Examination of the Knee

-
Reference List Physical Examination.pdf
-
Download Lecture Overview
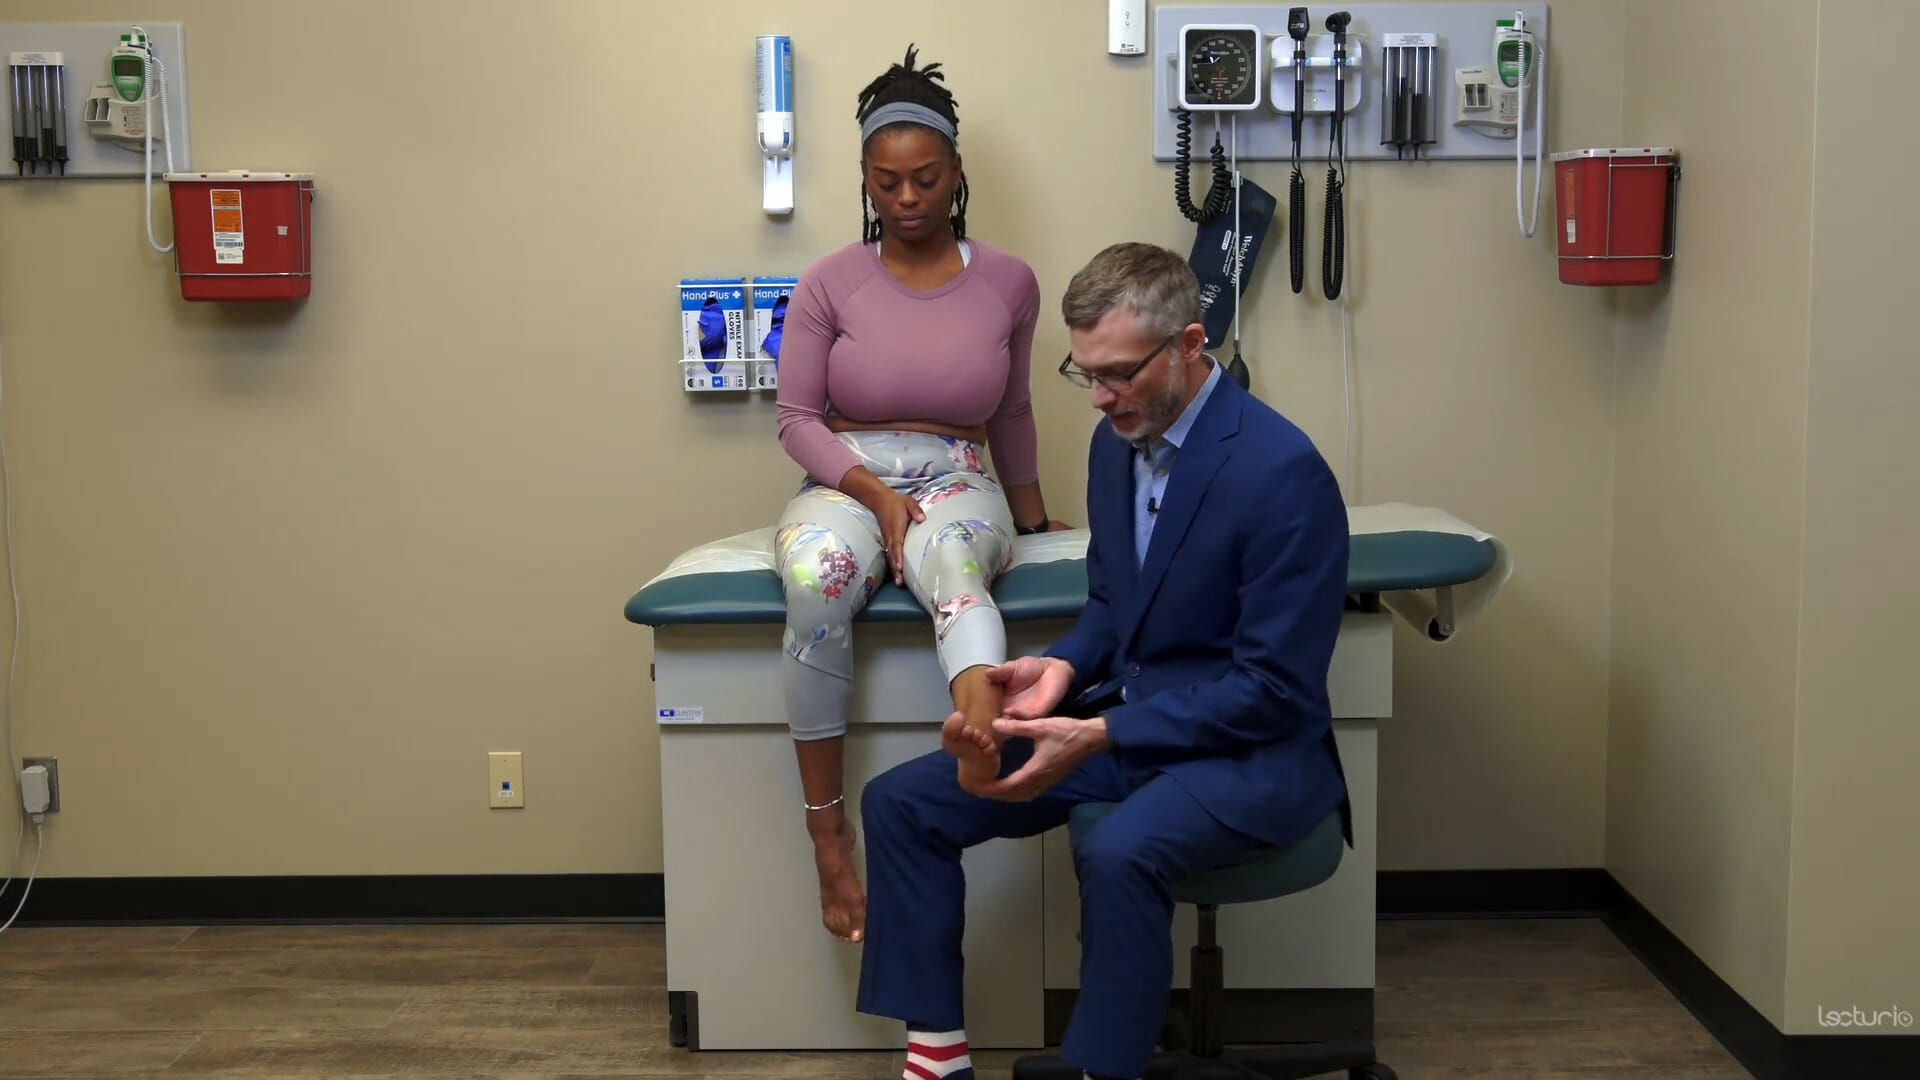
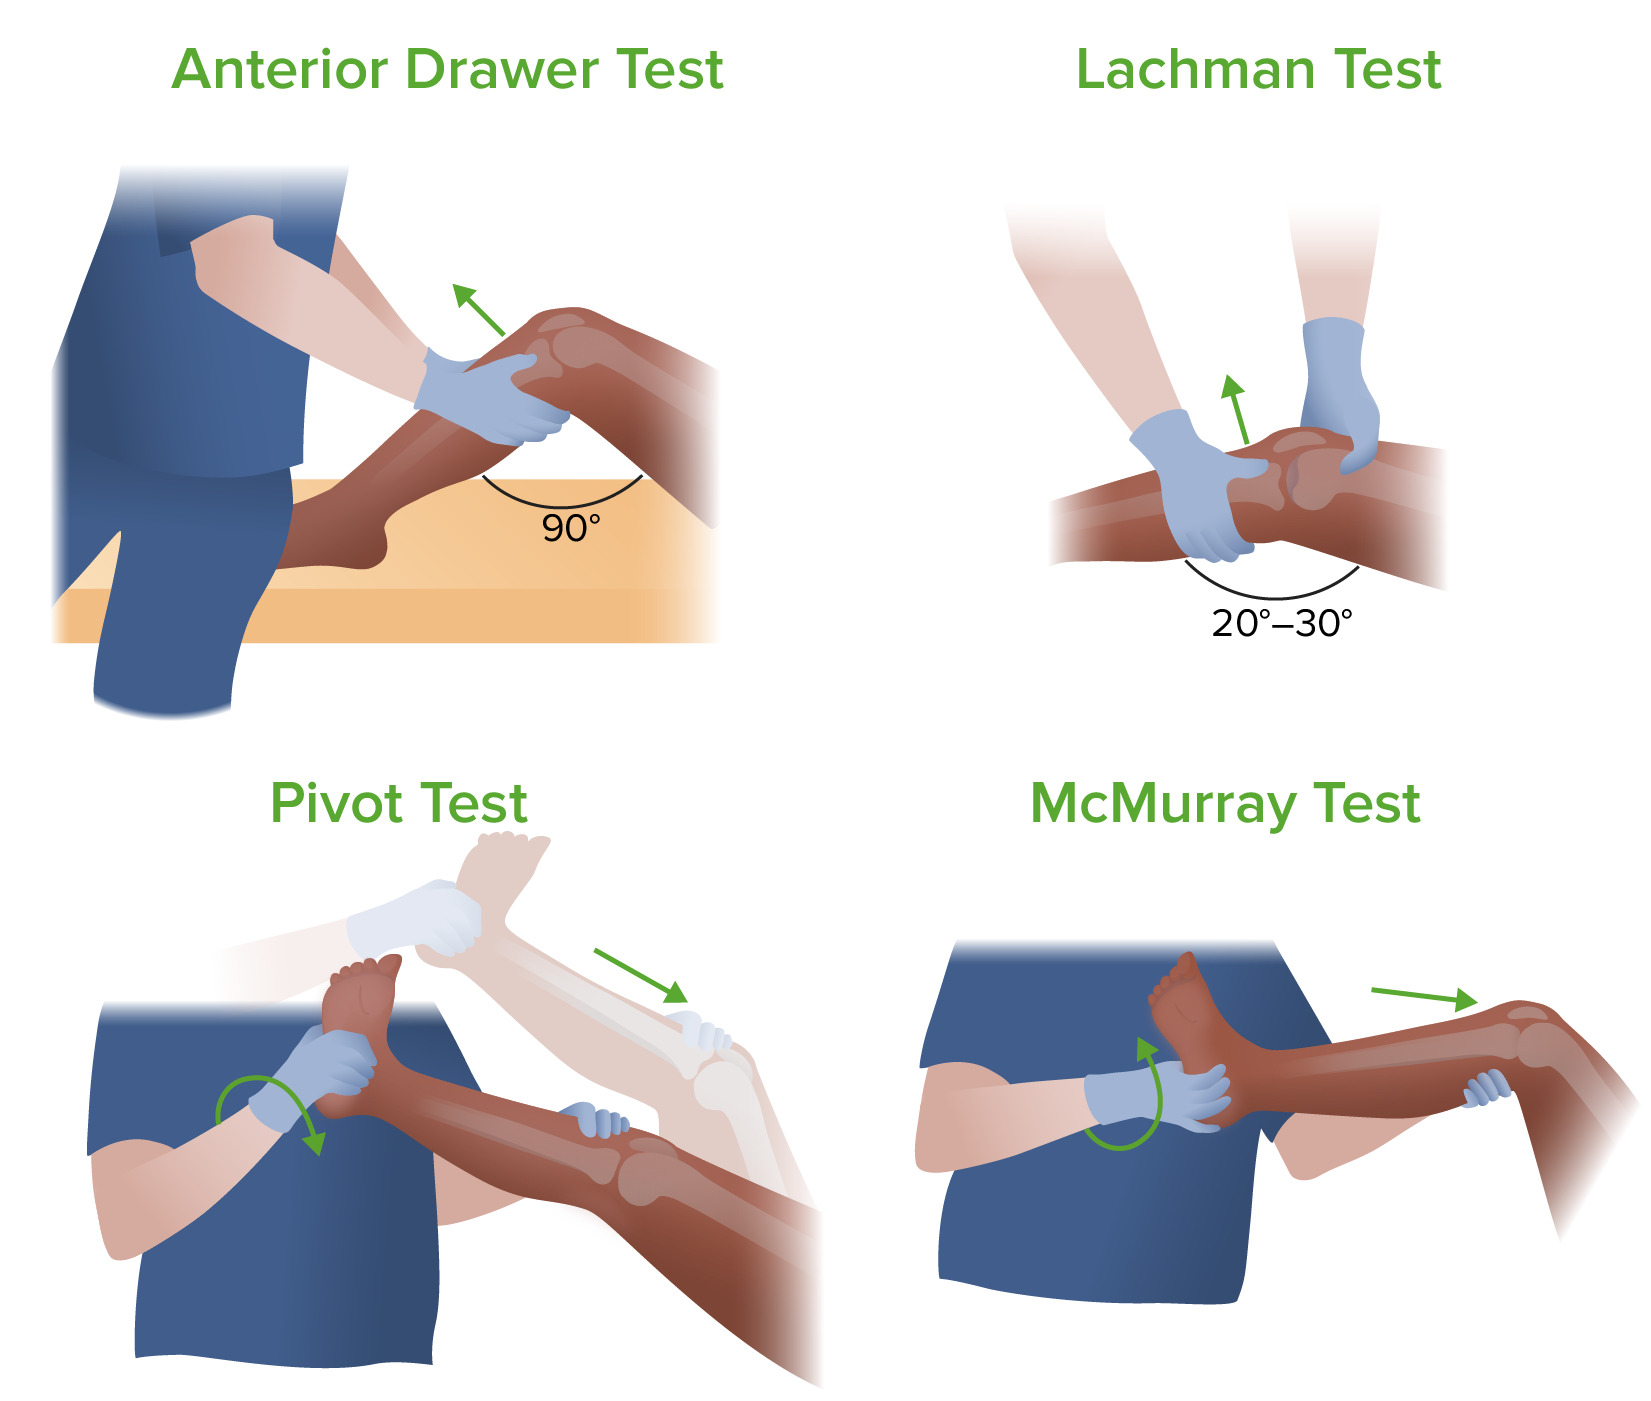
00:02 So now we're going to move on to the knee exam. 00:04 This is one of my favorite exams actually. 00:06 So we're going to start off by just doing gross inspection. 00:10 When I'm looking over here at the knee, there's a couple of things that I'm looking for. 00:14 First of all, in an older patient and here's my model here. 00:18 You'd be looking for just bony enlargement. 00:20 And those essentially represent osteophytes that are progressively enlarging the bone on either the femur, the end of the femur or on the tibial plateau there as well. 00:32 And so you'd be able to see that on the patient here by just seeing some evidence of enlargement of the bones. 00:38 In addition, patients with osteoarthritis in particular, 80 percent of the time, they have varus deformity. 00:45 And that's because for the most part, when people get osteoarthritis, it's more likely to involve the medial compartment. 00:52 So in my model here, again, this is a right leg, This is the fibula, this is the tibia, this is your femur, lateral epicondyle, medial epicondyle. 01:02 If a person loses cartilage in the medial side, then what's going to happen over time is the medial side of the knee will collapse and the knee will become increasingly deformed, such that we have, we end up with a varus deformity. 01:17 Normally as we look down again at our patients, there's this angle called the Q angle, which goes from up here, down the leg to the kneecap and then down here to the middle of the ankle. 01:29 And that line is essentially just slightly valgused, it's the term that we describe knees coming closer together, it's just slightly skewed valgus, maybe 5 degrees, no more than 10 degrees. 01:40 But as this patient gets older, as you get more arthritis and you have collapse of the medial compartment, that angle turns the other way and you start getting varus. 01:49 And so people who have advanced osteoarthritis tend to look a little bit "bow-legged" is the phrase that we would use, bow-legged rather than knock-kneed. 01:59 So that's one thing that I can look for and I can tell right off the bat that her knees as a young person appear to have a normal Q angle, it's the name of that angle that I was just describing. 02:08 The next thing that I'm going to look for on inspection is I'm always looking for scars to make sure there wasn't something missed on the surgical history and any evidence of bulging of the knee that might suggest an effusion. 02:19 So let's start off by moving on to palpation. 02:22 So palpation, I'm going to look for some specific bony landmarks. 02:25 First off, to find the joint line, I sometimes find that can be tricky to find the joint line when the patient's knee is fully extended but if I flex the knee just a bit, I'm going to find a very easy, to find little concavity here that represents, hold your knee there for just a moment, this space right here between the end of the femur and the top of the tibia and so you, I'm basically creating a hollow when I open up the knee and that represents the medial joint line so I can feel that very easily. 02:58 You'll note that it's right at the end of the kneecap, you'll find that space. 03:02 I'm going to walk along that space and I'm looking for any tenderness in that area, tenderness in the medial or the lateral joint line, maybe from osteoarthritis, because there's some synovial cysts and basically just some disruption of the cartilage in that area, which could be painful. 03:18 It could also be indicative of medial or lateral meniscal injuries, which would also be tender in those areas. 03:25 So those would be the main things that I'd be looking for with joint line tenderness. 03:28 Just distal to the medial joint line by just a few centimeters is the pes anserine bursa. 03:36 The pes anserine bursa is where three different musculotendinous structures are going to insert. 03:44 And those are the sartorius coming from up here which will insert here, the gracilis coming from here and then the semitendinosus from here and they're all inserting there. 03:55 And the reason that this structure is called the pes anserine bursa is because 'pes' means foot and 'serine' refers to the goose. 04:03 It's called the goose foot area because those three tendons come together like a little goose foot. 04:09 And since those three tendons are coming there and they're very important in terms of particularly adduction of the legs, people can get inflammation there right at the insertion of the bursa, and so folks with pes anserine bursitis will have exquisite tenderness, warmth, possibly some redness right at that spot. 04:25 And showing that again here on my model, it'll be right around here. 04:30 It's something you normally can't palpate. 04:31 But a person who has pes anserine bursitis, that won't be subtle. 04:35 The next part of palpation is going to be looking at the, looking for an effusion. 04:41 And there's three things that I'm going to do to assess for an infusion. 04:43 The first thing I'll do is assess for warmth, putting my hands on the knees like so. 04:49 If there's clearly one very hot joint, like somebody who has acute gout, then it won't be subtle, it will be very easy to pick up. 04:58 But in some instances, it's a bit more subtle. 05:00 A person who has chronic knee disease from a recent meniscal injury maybe a week or two ago, it may not be quite as obvious. 05:07 So one trick that I do is once my, the skin of my right and left hands have gotten acclimated to the temperature of the skin of each knee, if I then swap hands, I've now doubled the amplitude of the temperature difference between my my left hand and the new area of skin that I'm going to. 05:27 So if this was just a little bit warmer, my hand had gotten a little bit warmer and so when I switch it over to the cold knee, I should be able to more readily appreciate the distinction between those two areas. 05:36 The other thing to note, if somebody has bilateral knee effusions, is that the knee, the temperature of the knee should always be cooler or certainly no warmer than the tibial area. 05:48 Tibia is a very vascular bone. 05:50 There's a lot going on there. 05:51 And so the tibias are warmer than overlying the knee under normal circumstances. 05:58 Next, I want to assess for the presence of an effusion not just based on temperature, but actually trying to assess how much fluid there might be there. 06:04 So we've got two test to do that. 06:06 One is called the 'patellar ballottement test'. 06:09 What I typically do is I use my right hand to pull soft tissue out of the way. 06:13 This is more important in folks who have extra adiposity. 06:17 So you're pulling the soft tissue out of the way. 06:19 Then I bring my left hand over the top. 06:21 I'm pushing down any fluid in the suprapatellar area so that any fluid that's in the knee is now right behind the kneecap. 06:29 So now when I push down on the kneecap, if there's any evidence of fluid behind the kneecap, the kneecap will now float in the water like a buoy in the water. 06:40 And we use the term ballottement to indicate that. 06:43 Shown here on my model, this is my kneecap. 06:46 If there's a lot of fluid behind it, it's going to be floating above the surface of the patellofemoral groove And when I push down on it, I'll feel that knock, that knocking sensation as it knocks against the anterior surface of the patellofemoral groove. 07:00 So that's patellar ballottement. 07:02 And the next test is called the 'Bulge sign'. 07:06 And again, I'm trying to get all the fluid from one side over to the other side, over to at least this section or on the lateral side of the knee. 07:15 And having done that, when I sweep down the right side of the leg like so, if there's any fluid inside the knee, you'd see this sudden pocket of fluid bulge out on the medial aspect here. 07:28 And that's because the fluid inside a knee, it's not water. 07:31 It's much more viscous than that. 07:32 So if I move it over to one side, it'll stay there almost like, not, a little bit thinner than honey. 07:38 When I push down on the side suddenly to be pushed over to the other side and you'll see this very visible bulge appear if there's a sufficient amount of fluid in the knee. 07:47 So those are our main tests to look for a patellar effusion, I'm sorry, a knee effusion. 07:54 Now let's move on to assess the ligaments of the knee. 07:57 There's four main ligaments. 07:58 You've got your medial collateral, medial collateral, lateral collateral, and then inside is ACL and the PCL, your anterior cruciate and your posterior cruciate ligaments. 08:10 And this one conveniently has a torn medial collateral ligament. 08:14 To highlight that if a patient has a completely torn or very nearly completely torn ligament, particularly the MCL, when I stress it, there's going to be more laxity, there on one side than the other, there's just going to be a soft endpoint, just like when we were talking about the ankle. 08:32 Whereas if the ligament is completely intact, even if it has been strained and there's a little micro tears in it, then there should be a hard stop when I try and bend the knee in the other direction. 08:42 So let's take a look at that now. 08:44 So I lift up the knee, I flex it about 30 degrees. 08:48 Some people will do it in full extension. 08:50 I prefer to do it at this angle. 08:52 I'm putting my hand on the medial thigh and you'll note that I'm not putting my hand where the pain is because that's going to blur things because I would be exerting pressure on the medial joint line. 09:01 So I want to move my hand away from the area that's causing discomfort, rotate out a bit, push down the thigh, lift up on the foreleg. 09:11 And by doing that, I'm straining the lateral collateral ligament. 09:15 So again, here is the leg. 09:16 I'm rotating it out and now I'm lifting up the femur or lifting up the tibia. 09:21 And you can see that by doing so, I'm stressing the lateral collateral ligament. 09:25 and I'm looking for either laxity or the reproduction of pain when I do that. 09:29 If I want to test the medial collateral ligament, I'm going to try and strain this area. 09:34 So I put my hand on the other side of the thigh, I pull up on the foreleg like this and I'm straining the medial collateral ligament to see if that reproduces the patient's pain. 09:44 So those are the medial collateral ligaments. 09:46 Now, let's take a look at the ACL. 09:48 There's two tests that have been used to investigate the anterior cruciate ligament and I'll first show the 'drawer sign'. 09:56 So putting the knee at 90 degrees, I'm going to close this, if I may. 10:02 And just putting a little bit of weight here, I'm going to pull forward on her knee and what I'm doing is looking for a difference between the excursion of the tibial tuberosity forward. 10:14 If it's more on this side than it is on this side, I'd be concerned that the ACL here has been torn because that's supposed to prevent anterior translocation of the tibia. 10:26 The other test, which it turns out is actually been shown to be a bit more sensitive and specific for an ACL injury is to put the knee at more like 20 degrees and simply pull up in this way. 10:40 It's accomplishing the same thing, but it turns out that it's just a bit easier to detect an ACL injury when you perform that test called the 'Lachman's test'. 10:50 Next up, we'll test the posterior cruciate ligament. 10:53 That's going to be done by, again, putting the patient's knee at 90 degrees. 10:57 It's a little bit easier because I don't have to sit on her foot to accomplish this. 11:01 I'm simply pushing her tibia backwards. 11:03 The posterior cruciate ligament prevents posterior translocation of the tibia, and I'm going to compare one side to the other. 11:12 So that completes assessment of the various ligaments, we can now move on to taking a look at the menisci. 11:18 Now we're going to assess the menisci. 11:21 Just to remind you, we have a medial and lateral meniscus, it's essentially a figure eight structure that has a medial and a lateral side. 11:29 And 80 percent of the time when people have a meniscal tear, it's the posterior meniscus. 11:35 So shown on my model again here, I'm going to push the patella out of the way. 11:40 And again, this is a right knee. 11:41 So this is the medial meniscus. 11:42 This is the lateral meniscus. 11:44 If I flip this over, it's really this area that's most likely to get torn. 11:49 And when it's torn, you'll have what's called a bucket handle lesion where this torn meniscus flips over on itself and can cause a lot of pain when the patient's walking. 11:58 If it's an anterior lesion and it's flipped over on itself, what will happen is the patient can't fully extend their knee because of this piece of cartilage that's stuck in the way. 12:08 So that's called blocked extension. 12:10 And you may simply get that from the history when you're talking to the patient that sometimes they walk and their knee gets stuck while trying to ambulate. 12:17 So we're going to try and do two tests that look at the structure, the function of the meniscus. 12:27 So first off, let's do the McMurray. 12:29 And if this is the person, if this is the knee that the patient is having trouble with, you're going to be doing the McMurray on both sides. 12:37 One's to test the medial meniscus and one's to test the lateral meniscus. 12:42 I always find that this test is also useful because I'm simultaneously testing range of motion of the knee because I'm going to fully flex her knee. 12:49 So I like to be efficient when I'm doing the physical exam. 12:51 And oftentimes my range of motion testing comes into play while I'm doing other maneuvers. 12:56 And this is a good example of that. 12:58 So, doing the, I'll start with the medial meniscus, it involves three steps. 13:04 So it really is one of the most complicated parts of the musculoskeletal exam and understanding the anatomy is really important. 13:11 But remember that the meniscus is attached to the tibial plateau. 13:15 It's not attached to the femur. 13:16 So anything I do to rotate the tibia, and simply rotating her foot like this is actually rotating the tibia, even though the range of motion of the knee we focus on flexion and extension. 13:27 There is pivoting, there is some pivoting that happens with her tibia. 13:30 So when I rotate her tibia, I'm actually rotating the menisci on top of her tibia. 13:35 So the first thing I'm going to do is flex her knee. 13:38 And then because I want to catch the posterior aspect of that meniscus, I'm going to externally rotate her tibia because what I've done now is I've brought that posterior ring of the medial meniscus forward. 13:52 So now when I try and catch it while extending her knee, I should be able to feel a pop as I bring her knee back into full extension. 14:02 I'm going to do that again. 14:03 I'm going to put my finger on the joint line, which we talked about finding before, because if there's going to be a pop, I'm really going to feel it there. 14:10 Her ankles rotate it out. 14:12 I'm putting a little bit of varus strain on the knee and out I go like that to see if I can find a pop or a reproduction of pain would also be a characteristic feature. 14:25 Secondly, I'm going to do the lateral meniscus, so it starts with flexion. 14:30 Then again, there's in this case internally rotating the tibia. 14:35 So I'm bringing the tibia this way, which brings the posterior aspect of the lateral meniscus forward, putting my fingers again on the joint line. 14:44 And now I'm going to extend while also putting a little bit of valgus stress to really pinch that lateral aspectof the knee. 14:50 So it looks like this. 14:54 To do it very quickly on both sides, it's kind of a little dance you're doing with the knee, so that's the McMurray. 15:01 And of course, I would, typically I would do the unaffected knee first to make sure I've got a baseline before moving on to the knee where the patient is complaining of symptoms. 15:13 The next test for the meniscus is I'm going to have the patient roll over onto your stomach, if you wouldn't mind, Shayla. 15:22 And this test is a similar concept, I'm trying to basically put pressure on the meniscus and see if I can find a spot where there's a defect in the meniscus or one piece that's folded over on another. 15:34 So I'm simply taking the knee and I'm pushing down while moving the knee in a similar kind of way that I was doing before. 15:42 I'm just doing it from this position. 15:44 I find this is useful for patients who have too much pain to go through the meniscus or if they have significant range of motion issues and they can't fully flex their knee. 15:54 I only need to get to 90 degrees to be able to do this, this particular test.
About the Lecture
The lecture Examination of the Knee by Stephen Holt, MD, MS is from the course Examination of the Lower Extremities.
Included Quiz Questions
Which test involves having the patient lie supine, and flexing their knee 90 degrees with their foot flat on the table, while the examiner sits on their toes and pulls the tibia forward to check for anterior movement that is indicative of an anterior cruciate ligament (ACL) tear?
- Anterior drawer test
- Lachman test
- McMurray test
- Ballottement test
- Apley test
What is the likely diagnosis in a patient with knee pain, especially with twisting or rotating, which is accompanied by locking or catching with walking, as well as swelling, stiffness, and difficulty extending the knee?
- Meniscal tear
- Anterior cruciate ligament tear
- Gout
- Pes anserine bursitis
What finding is most commonly seen in older patients with osteoarthritis during a knee inspection?
- Varus deviation
- Valgus deviation
- Ballottable patella
- It is not possible to see changes in osteoarthritis on inspection; it can only be seen on an X-ray.
- Warmth, redness, and tenderness about 2 inches below the medial knee joint line
What is the likely diagnosis in a patient with warmth, redness, and tenderness about 2 inches below the medial knee joint line?
- Pes anserine bursitis
- Anterior cruciate ligament tear
- Gout
- Meniscal tear
- Collateral ligament tear
What is being tested for when an examiner anchors their hand on the medial side of the knee and stresses the opposite side for laxity?
- Lateral collateral ligament tear
- Anterior cruciate ligament tear
- Medial collateral ligament tear
- Knee effusion
- Meniscal tear
For which diagnosis do the patellar ballottement test and the "bulge sign" in a knee examination test?
- Knee effusion
- Meniscal tear
- Lateral collateral ligament tear
- Anterior cruciate ligament tear
- Posterior cruciate ligament tear
For what diagnosis do the anterior drawer test and Lachman test evaluate?
- Anterior cruciate ligament tear
- Collateral ligament tear
- Posterior cruciate ligament tear
- Meniscal tear
- Knee effusion
For what diagnosis do the McMurray and Apley test evaluate?
- Meniscal tear
- Knee effusion
- Lateral collateral ligament tear
- Anterior cruciate ligament tear
- Osteoarthritis of the knee
Author of lecture Examination of the Knee

Stephen Holt, MD, MS
Customer reviews
5,0 of 5 stars
| 5 Stars |
|
1 |
| 4 Stars |
|
0 |
| 3 Stars |
|
0 |
| 2 Stars |
|
0 |
| 1 Star |
|
0 |
compared to the other knee examination videos that I have watched, this one explains everything best video.
