Playlist
Show Playlist
Hide Playlist
Diagnosis of the Knee

-
Reference List Osteopathic Manipulative Medicine.pdf
-
Download Lecture Overview
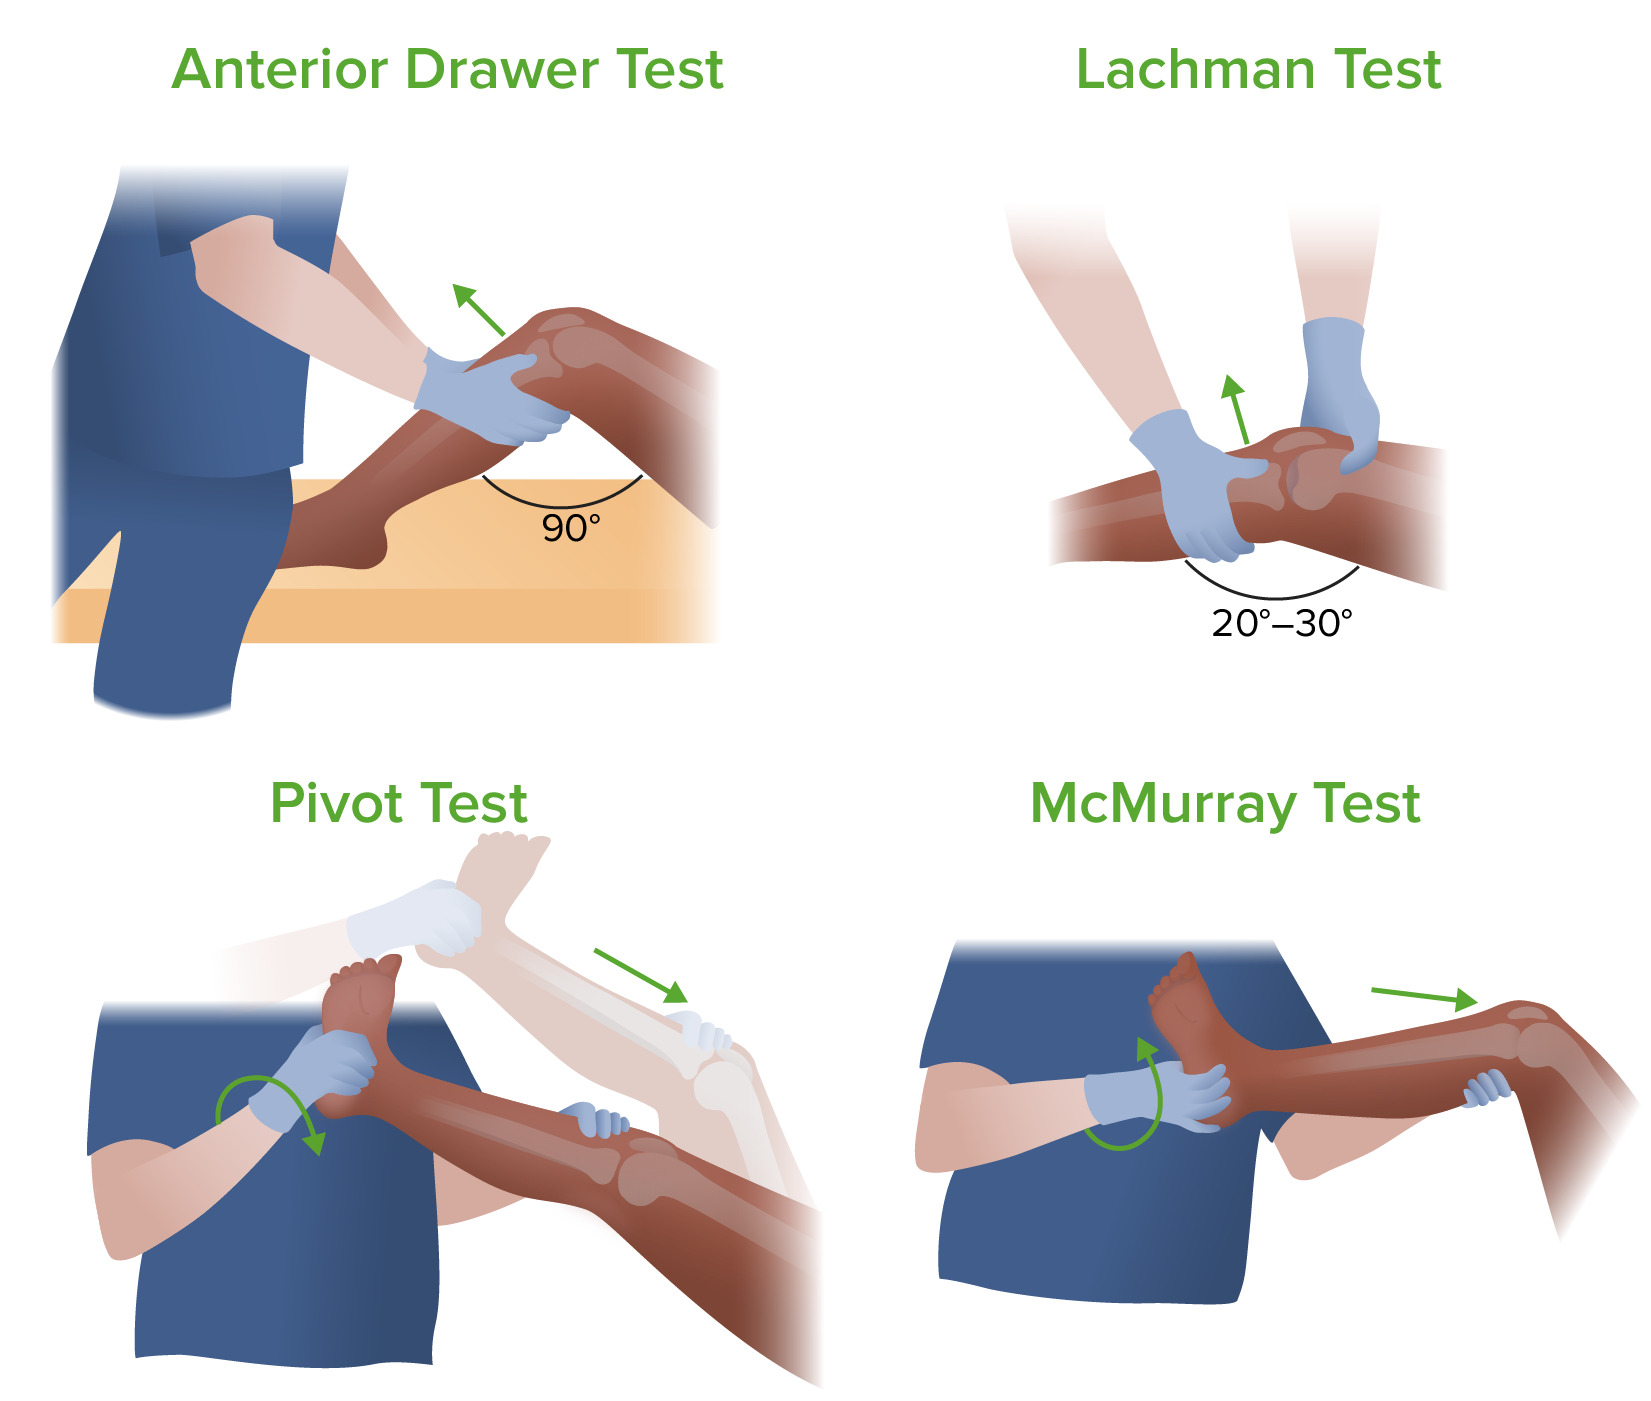
00:01 Osteopathic diagnosis of the knee joint So we are gonna follow our mantra of look-feel-move. 00:05 So we're gonna start with observation of both knees taking a look to see if there's any asymmetries, any swelling, anything that we could note that is out of the ordinary. 00:15 And so through observation, sometimes we might see more swelling, maybe some redness from infection you also wanna take note of the muscle masses here. 00:24 Sometimes, the vastus medialis might be a little bit smaller and wasting and contributing to knee pain causing patellar track issues So take a look at the knees, see if you see anything closely abnormal that may contribute to knee complaints. 00:40 After observation, we're going to palpate and feel the structures of the knee So you wanna get the tone of the quadricep to see if there's any spasms or decrease in tone You wanna feel the patella, check for any swelling in the region, any point tenderness. 00:55 You want to feel around the patella and then below the patella, you could get a sense of the patellar tendon as it blends into the tibial tuberosity at the tibial tuberosity, sometimes patients may have pain. 01:07 Also, just a little bit medial to it you could find pes anserine which is the attachment of set of 3 muscles and that could also cause issues and problems in that point. 01:19 You want to get a sense of the posterior knee and check the popliteal fosssa, get your hands behind the knee, assess the tension, sometimes you may have baker's cyst or swelling behind the knee and then check around the fibular head, sometimes there might be tenderness and points around the knee that might cause problems. 01:38 Your IT band or your Iliotibial band comes down and blends into that fibular head So, tension over here is very common with overuse, with runners causing lateral knee pain So assessing the tissue in the musculoskeletal structures around the knee is important using palpation Once we observed and palpated it, we're going to motion test the knee, the knee's primary motion is in the saggital plane with flexion and extension So the knee at 0 is straight and when I'm checking for flexion, what I'm going to do is to bend the knee and see how far the knee could bend. 02:17 And then you wanna assess the range of motion on both sides and compare the sides in addition to seeing how far the knee could flex. 02:26 Now extension is similar to the elbow where it locks out and it really doesn't hyperextend. 02:31 If you see a knee hyperextending too much, then that may be a cause of concern. 02:36 There's some small motions in the coronal plane with AB/ADduction, so if abduction bringing the distal leg out in a valgus motion Again, very little play in there, the anatomy of the knee does not allow for too much valgus motion and then varus would be bringing the distal leg a little bit more medially and that would be a varus motion or medial ADduction of the knee There is also very little internal and external rotation of the knee again, because of the way the anatomy does not allow for a lot of play in the transverse plane here so, you could do a little bit of internal rotation and external but is very limited at the knee joint. 03:24 So the primary motion is flexion and extension and we could diagnose somatic dysfunctions of the knee based on how much flexion and extension occurs. 03:33 If you find a restriction of the knee, then potentially there might be a somatic dysfunction. 03:37 So if I was to flex the knee and really only get to 90 degrees and notice a restriction in flexion, then we'd call that an extension somatic dysfunction. 03:47 So with knee motion testing, if we find that the knee can freely flex, but cannot fully extend, then that is a flexion somatic dysfunction. 04:00 So to diagnose the fibular head, remember the fibula is a long bone and you have the fibular head here, as you come down from the joint space, you could find the fibular head, it should be a knob here and that is the proximal portion of the fibula. 04:14 The distal portion is your lateral malleoli. 04:16 So there's a relationship when you move your ankle, it will create motion at the fibular head and so we have somatic dysfunctions that could occur here, what we wanna do is we wanna monitor the fibular head and we could motion test by moving the ankles. 04:30 So when I dorsiflex and evert the foot, the fibular head should move anterior into my thumb. 04:36 when I plantarflex and invert, the fibular head will then move posteriorly into my fingers and so I could assess the range of motion here at the fibular head as I move the ankle into dorsiflexion, eversion or plantarflexion and eversion. 04:50 You name the fibular head for the side that it likes to go to. 04:54 So if the fibular head likes to glide posteriorly, that's a posterior fibular head. 04:58 If it likes to glide anteriorly, that's an anterior fibular head. 05:01 The other way you could diagnose a fibular head is to directly motion test this. 05:04 So you could get on the fibula and on the fibular head and you're going to try to articulate the joint by pushing posterior and anterior. 05:15 But you don't wanna pull straight in a sagittal plane because of the articulation of the fibula on the tibia it's a little bit more angled, so what you're gonna do is you're gonna push more posteriorly and medially and pull more anterior and lateral. 05:29 This way you could be more accurate when you're trying to mobilize the fibular head. 05:33 It doesn't move that much but you would usually find a freedom of motion either on one plane or the other. 05:40 And so, you will name it for the way that it likes to glide. 05:43 Does it like to glide anterior, then that will be a anterior fibular head and if it likes to glide posterior, then that's a posterior fibular head. 05:51 There are several special tests that we could perform on the knee to help rule out or rule in different pathologies with the knee. 05:58 So first we're gonna take a look at the knee cap. 06:00 So the knee cap, sometimes could be irritated, you could have swelling behind it. 06:07 And so, you could have a special test called the ballotement test. 06:12 and what the ballotment test does is if there is swelling in the knee, you're gonna gently push down on the knee cap and as you push down because of all the fluid, it kind of pops up and down. 06:22 So, if there is swelling behind the knee and you're suspecting that there is fluid behind the knee, you could take the knee cap and just gently push down and you'll get a sense of the knee, kind of floating in water, pushing down and coming back up. 06:36 So the patellar grind test is a test that we could use to try to assess for patellofemoral tracking syndrome So your patella rise on the femur on a track and if there is damage to the cartilage, wear and tear or if the patella is not tracking well because of the pull from the quadricep, it could cause inflammation behind the knee. 06:55 So, the patellar grind test is you're gonna take a patella and just kind of push it inferiorly towards the ankle and the foot and we're gonna ask the patient to contract their quadricep muscle, so go ahead tighten up your quadricep muscle and relax. 07:09 And when they tighten up that quadricep muscle, if you're having pain, that would be a positive test because there's inflammation there and as they try to pull, you could elicit pain. 07:20 So a positive patellar grind test would mean that there's a need for more investigation to rule out patellofemoral tracking syndrome. 07:29 So there's ligaments that help to stabilize our knee. 07:33 We have the anterior cruciate ligament and the posterior cruciate ligament and after some sort of trauma, there may be compromised tears to those ligaments and there's special test to try to see if the ligaments are torn. 07:47 So the anterior cruciate ligaments prevents anterior slippage of the tibia on the femur. 07:53 So to motion test to see if it's intact, we could perform an anterior draw test. 07:58 So the anterior draw test, we're going to flex the knee up, we could stabilize the foot by kind of sitting on it, and then we're gonna place our hands behind the tibia and try to anteriorly draw the tibia on the femur. 08:12 And so if there's increased play if the joint moves forward excessively, if there's no good end feel, then there's a possibility that the anterior cruciate ligament has been torn. 08:25 If you wanted to check this, you could also do a Lachman's test. 08:31 So the Lachman's test test for anterior cruciate ligament stability but this is done at 30 degree angle and what you're going to do is you're going to stabilize the femur while you're simultaneously pulling up on the tibia. 08:46 So it's still motion testing the motion of the tibia on the femur by drawing the tibia anteriorly and here, if you have increased joint play, not a good end feel as you're pulling, then that's a positive test and you have to suspect possible anterior cruciate ligament damage. 09:05 To test for the integrity of the posterior cruciate ligament, what we're gonna do is to try to push the tibia posteriorly on the femur, so the posterior cruciate ligament will prevent the tibia from gliding posteriorly on the femur, so what we're going to do is to bring the leg up to 90 degrees, support the feet by sitting on the foot here a little bit. 09:29 I'm gonna get my palms anteriorly on the tibia and then push into the table, as I push into the table, if there's increased give, then that might be a possibility of a posterior cruciate ligament tear. 09:43 So the knee also has a medial collateral ligament and a lateral collateral ligament to help stabilize the knee from lateral motions and medial motions. 09:53 And so, if we wanna test the medial collateral ligament, what we're going to do is we're going to gap that area so we're going to create a valgus stress on the knee. 10:02 So I'm gonna support the femur and I'm gonna keep the knee bent at like 30 degrees. 10:07 If you keep it full, fully locked out at 0 degress, it's not gonna have any give for you to create a valgus or varus stress. 10:16 So in valgus stress, I'm taking the distal portion of the leg laterally, and so as I do that, it gaps the medial aspect, testing for the integrity of the medial collateral ligament. 10:29 If there's increased motion and movement or if there's pain there, then I need to suspect possible injury or tear of the medial collateral ligament For the lateral collateral ligament, what I'm going to do is perform a varus stress test So the varus stress test, we're going to be taking the distal leg and bringing it more medially. 10:49 and as I bring it, bring the lower leg medially, that's going to gap the outer portion of the knee thus, if there's increased motion or pain on the lateral aspect of the knee as I perform a varus stress test, then that is a positive test for a potential lateral collateral ligament injury. 11:09 So the meniscus helps to buffer the space between the femur and the tibia. 11:15 So we have a medial and lateral meniscus that are gel pads that lie between the bones. 11:20 Sometimes, those menisci could be injured due to trauma or due to wear and tear. 11:26 So, to try to check if there is a meniscal injury, we could perform McMurray's test. 11:32 So McMurray's test puts a strain on the knee that would compress the tibia on the femur. 11:39 So when we fully flex the knee, that would compress that region, so, we're gonna start by supporting the leg, I'm gonna flex the knee up. 11:49 I'm gonna monitor at the joint spaces where the meniscus would lie cause sometimes I could detect the click or popping noise. 11:57 We're going to support the calcaneous here so we could create internal or external rotation force at the knee. 12:05 So what I'm gonna start with is I'm going to internally rotate the knee, I'm going to flex the knee all the way up and I'm going to ADduct the knee So flexion, ADduction, internal rotation, holding that, I'm gonna slowly straighten up the knee and as I straighten out the knee, sometimes you'll feel a pop or a click or the patient may have pain indicating a meniscal injury and then we're gonna test the other side by externally rotating, ABducting and fully flexing the knee. 12:39 And then from here, we're gonna slowly straighten out the leg and then sometimes you could feel a click. 12:43 So again, when you do it combined more smoothly you could do internal rotation, ADduction, straightening out the knee and then external rotation, ABduction and straigthening out the knee. 12:55 The key really is to see if there's any pain or if any clicks occur and if that does, that's a positive McMurray test indicating a meniscal injury or tear. 13:06 Apley's compression test. 13:08 So Apley's compression test is used to assess for any sort of meniscus injury. 13:13 So what we're going to do is we're going to flex the knee up, and provide a compression force down to the table. 13:21 And when while we're compressing, we're going to add external rotation and internal rotation. 13:26 This will put a strain on the meniscus and if there's inflammation or some sort of meniscal tear or damage, that's gonna elicit pain. 13:33 So, we're gonna flex up to 90 degrees, we're gonna stabilize the foot, add a compression down towards the table and then internally rotate and externally rotate. 13:43 and we'll see if the patient has pain. 13:45 Again, if there's pain present depending on which side the patient feels the pain, there might be a medial or lateral meniscal injury. 13:54 Apley's distraction test. 13:55 So Apley's distraction test is a test where we're going to be flexing the knee with the patient in prone position and we're going to be pulling, and as we pull the lower leg, up towards the ceiling, we're gonna be stressing the ligaments. 14:09 So this could be done in conjunction with the Apley's compression test cause after you compress, then you could do the second part and traction. 14:16 And if we traction and internally and externally rotate and the patient has pain, that could give us a better idea of whether or not there is ligamentous injury there. 14:25 So, we're gonna flex the knee up to 90 degrees, stabilize by the hamstrings, keeping the knee supported on to the table, and then we're gonna provide a force towards the ceiling, tractioning on those ligaments and then we're gonna provide a little bit of internal rotation to the knee and external rotation to the knee and if there's any pain with internal rotation or external rotation, then that's a positive Apley's distraction test for some sort of ligamentous injury.
About the Lecture
The lecture Diagnosis of the Knee by Sheldon C. Yao, DO is from the course Osteopathic Diagnosis of the Knee Region.
Included Quiz Questions
Which anatomical structure does the iliotibial band attach to inferiorly?
- Gerdy's tubercle on the lateral condyle of the tibia
- Lateral patella
- Lateral distal femur
- Lateral joint capsule
Which of the following tests can be used to examine the anterior cruciate ligament?
- Anterior drawer test
- Posterior drawer test
- Ober’s test
- Watson’s test
- Straight leg raise test
Which of the following angles of the knee is the correct position for using the Lachman’s test to assess the integrity of the anterior cruciate ligament?
- 20-30 degrees
- 10-15 degrees
- 40-50 degrees
- 50-60 degrees
What is the correct angle or position of the knee when performing a posterior drawer test?
- 90 degrees
- 20 degrees
- 45 degrees
- 180 degrees
- 270 degrees
What anatomical structure is primarily assessed during a valgus stress test of the knee?
- Medial collateral ligament
- Lateral collateral ligament
- Posterior cruciate ligament
- Iliotibial band
- Patellar ligament
Author of lecture Diagnosis of the Knee

Sheldon C. Yao, DO
Customer reviews
5,0 of 5 stars
| 5 Stars |
|
1 |
| 4 Stars |
|
0 |
| 3 Stars |
|
0 |
| 2 Stars |
|
0 |
| 1 Star |
|
0 |
This video is a good review of Knee examination and maneuvers. I especially liked the meniscal tear examinations.
