Of course, it can’t see everything inside. Soft tissues aren’t easily discernible, and subtle bone injuries can be challenging to spot on an X-ray. Despite this, X-rays are widely used because they are quick, simple, non-invasive, and more affordable than other imaging studies. The only problem is, to the untrained eye, interpreting an X-ray can be perplexing – you don’t know what it is you’re looking at most of the time.
There were a couple times when I was asked to read a chest X-ray and I said it was normal. When in reality, I had missed something important like a fracture or a lung mass. It’s easy to miss the important things without having a list in your head of what to check. And that’s where this article comes in! Here, we’ll discuss how X-rays work and the basic concepts of X-ray interpretation. After that, I’ll walk you through reading different types of X-rays with some handy mnemonics.
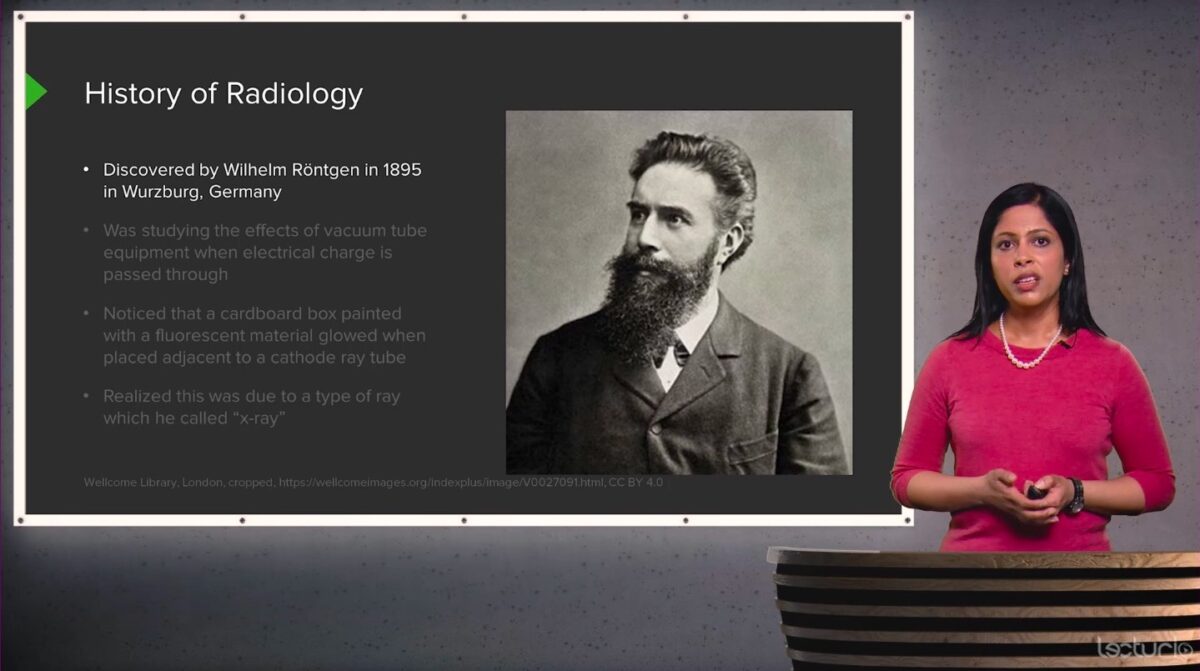
How does an X-ray work?
If you’ve never had your X-ray taken before, the body part you’re studying is usually placed between the X-ray source and an X-ray detector. The X-ray machine then uses electromagnetic radiation to produce images of the structures between the source and detector.
Depending on the amount of X-ray beams passing through a structure, they’re shown in varying opacities on the film. Think of these images as basically the “shadows” of the structures inside the body.
The basic concepts of X-ray reading
As I mentioned, different structures will show different opacities on film. What does this mean? Soft tissues of the body or air allow most X-rays to pass through. These structures appear dark gray or almost entirely invisible. Bones, tumors, and fibrous tissues allow fewer X-rays to pass through. These show as white or opaque on the X-ray films.
Think of it like shining a light through different objects. For thicker objects, light doesn’t pass through as readily, making their shadows easier to see. For thinner objects, light passes through easier, making their shadows almost translucent or totally transparent.
When we describe something as “radiopaque,” it indicates visibility under X-rays: for example, looking at bones, metallic objects, etc. Meanwhile, we have objects that are “radiolucent,” which means they’re darker and harder to see on the X-ray. So, while X-rays are excellent for detecting bone fractures, for assessing soft tissues like ligaments and tendons that are less visible on X-rays, we might prefer ordering an MRI. Sometimes, one imaging test is just not enough.
Also, always take note of the “view” of your readings. Some structures are photographed from back-to-front (PA) or front-to-back (AP). Some are taken while lying down or with the patient lying on their side. Meanwhile, pictures of limbs may be shown laterally, oblique, from the front, and many other types of views. It can be a lot to master but in this article, we’ll tackle only some of the most common structures.

Take the Course: Radiology
Master imaging modalities with Dr. Hetal Verma from Harvard Medical School.
How to read an X-ray
In medical school, you’ll cover various topics in radiology. One of the earliest and most basic of topics will be about reading X-rays. While many X-ray results come with interpretations from a radiologist, sometimes patients may hand you an X-ray film without an interpretation. So by the time you practice, make sure you’re familiar with at least the most common one: the chest X-ray.
Chest X-ray interpretation
As a doctor, you’ll encounter a lot of chest X-rays, as they are frequently ordered even for routine check-ups to diagnose a range of issues including rib fractures, heart diseases, lung conditions, and foreign objects in the digestive tract or windpipe.
Like any guide, we’ll go through this one step-by-step because, especially during emergencies, you will want to know how to read the chest X-ray quickly and as thoroughly as possible.
First, check the view of your chest X-ray: is it PA or AP? Most chest X-rays are done in PA view because AP view magnifies the cardiac silhouette and superior mediastinum. Hence, if you want to accurately measure heart size, you will want to get a PA view.

Normal chest X-ray
Image: “Normal AP chest X-ray” by James Heilman, MD. License: CC BY 3.0Next, you move on to identifying and assessing the structures.
This step can be as easy as A-B-C. That’s because the mnemonic for this is ABCDEFGH. There are many “ABC” mnemonics out there but I feel like this one covers the most.
- Airway
Begin by identifying the trachea and mediastinum. The trachea should be right down the middle – if it’s not, that means it’s being pushed or pulled by an abnormality. Check for foreign bodies. Things like pacemakers and tubes and wires may be attached to the patient. Metallic foreign bodies are usually the easiest to see. For the mediastinum, check for masses, inflammation like granulomas, and possible trauma or dissections.
- Bones
Next, you move to check the bones. These are usually the thickest structures you’ll see on the X-ray. Apart from the obvious ribs, make sure to check the spine, clavicles, and humerus as well. Check for fractures, dislocations, and other bone lesions. You should barely see the thoracic vertebrae behind the heart. You should also check for scoliosis of the thoracic spine.
- Cardiac
When moving to the heart, check the cardiac size. It should take up less than 50% of the mediastinum. The aorta and other blood vessels should be noted for widening or tortuosities. You should also check for any calcifications in the heart and note possible valve replacements previously installed.
- Diaphragm
Next, we move down to check the diaphragm. In general, your right hemidiaphragm is higher than the left. That’s normal. But the hemidiaphragms can be even higher when there is lung collapse or paralysis. In standing position, since gas will go up, intra-abdominal perforations can be seen under the diaphragm.
- Effusion
Next, check for effusion. Pleural effusion is basically the build-up of fluid in the pleural cavity. This can be seen as the blunting of the costophrenic angle (the corner of between the diaphragm and the outer part of the ribs). In more basic terms, it’s the outer corners of your lungs on the X-ray.

Chest radiograph showing bilateral pleural effusion, massive on the left side
Image: “Chest radiograph showing bilateral pleural effusion” by Department of Pulmonary Medicine, Kasturba Medical College, Manipal, Karnataka, India. License: CC BY 2.0- Fields (of the lungs)
Next, we move to the lungs themselves. Check for masses and infiltrates, which are usually shown as haziness or even opaque shapes in what should be clear lungs. You may also see cavities in lungs which present as ring shapes in the lung fields.
- Gastric bubble
Take note of the gastric bubble which can be seen on the left side of the patient, under the diaphragm. Hiatal hernias may be seen pushing their way into the thorax. Check for bowel loops under the diaphragm. If you want a better view of the abdomen, it’s advised you get an X-ray of the abdomen instead.
- Hilum
Lastly, look at the hilum. These are the “lung roots” composed of bronchi, pulmonary vessels, and lymph nodes. Check for hilar enlargement which is usually caused by enlarged lymph nodes. Check for masses in that area as well. The pulmonary arteries shouldn’t be larger than 1.5 cm.
X-ray of extremities and spine
This part will cover bony parts in general. When you want to assess a possible fracture, an X-ray is always a good place to start. Here, we use a separate set of ABCs that are different from those you read in the previous section. Instead of ABCDEFGH, we will use the mnemonic ABCs (the ‘s’ is included).
- Adequacy and alignment
First, verify if the view and laterality (your left or right side) correspond to what was ordered for the patient. Check if there are any structures obscuring the part you want to study, and if there are more views you can order to get a better assessment of your target bone.
Next, check the alignment. As you may have guessed, if the bones aren’t aligned where they should be or if there’s anything out of place, there is a problem.

Radiographs showing a posterolateral dislocation of the elbow
Image on left: anteroposterior view
Image on right: lateral view
- Bones
Examine the bones for changes in density, which can point to osteopenia. As a doctor, osteopenia can be something you could address to avoid fractures in the future. You might even find bone lesions or masses! So don’t let any apparent fractures distract you from other possible bone findings that the patient may have.
- Cartilage
Cartilage is not easily seen on X-rays. However, you can see the joint spaces where they reside. For example, if two bones are too far apart or the space between them is too wide, you might want to consider a displacement or even a ligament tear. If the space is too thin, you might be looking at some cartilage loss, which can affect the patient’s movement and is a sign of osteoporosis.
- Soft tissue
Lastly, check the soft tissue. These parts aren’t easily observed. However, with careful assessment and some practice, you’ll be able to see muscles and where there may be swelling. Even tissues like fat, in the case of “fat pad signs”, can indicate a non-displaced fracture at the elbow. Of course, if you want a better view of soft tissue injuries in patients, you’ll still want to order an MRI to get a better view.
Abdominal X-ray
Abdominal X-rays aren’t ordered very often as many structures in the abdomen are more adequately assessed through ultrasound. For this mnemonic, we’ll deviate from our ABCs and think of this as a short name for Abdomen: ABDO.
- Air
There are some places where air should be and where it should not be. In general, air should be limited to the bowel loops– but not too much to the point it indicates an obstruction. If it’s outside the bowel loops, you might consider pneumoperitoneum, a condition where air accumulates within the peritoneum.
- Bowel
Next, look at the bowels themselves. Your small intestines should predominantly occupy the center of the abdomen, while the large intestine should generally stay at the periphery. If all the bowel loops are squished together at the center, you may be looking at ascites, where water builds up in the peritoneum. The 3-6-9 rule should guide you in measuring the length (in cm) of the small bowel, large bowel, and the cecum.
- Densities
Examine visible bones including the ribs, hips, lumbar vertebra, and femoral heads. You may find bright calcifications that point to stones in the gallbladder or the kidneys and urinary tract. You may even find previously-ingested metallic materials, more commonly found in children.
- Organs
Solid organs are generally not well-defined on X-rays since they’re made of soft tissue. However, you may still see contours of fat surrounding different organs and peritoneal fat.