Playlist
Show Playlist
Hide Playlist
OMM Mechanics: Lower Extremity

-
Slides OMM Mechanics Lower Extremity.pdf
-
Reference List Osteopathic Manipulative Medicine.pdf
-
Download Lecture Overview
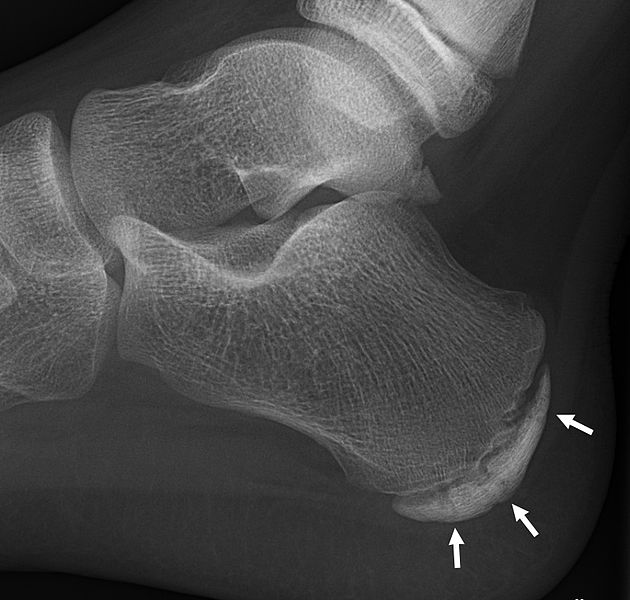
00:00 We’re going to talk about osteopathic manipulative medicine of the extremities. 00:05 We’re going to start with the lower extremities. But I want to start by saying when people think of manipulation, they think of the spine. 00:12 But there’s nothing magical about the spine. 00:14 We’re talking biomechanics of the musculoskeletal system. 00:19 There’s nothing that would preclude you from manipulating the arms or the legs from applying the same principles of biomechanics to the legs. 00:28 We’re going to talk about the anatomy, the physiology, and the pathology of the lower leg and the upper extremity. 00:37 When you start thinking about the lower extremity, the first thing you do is you look at it. 00:43 It’s important that it not be in one position. 00:46 One view is no view. One way of examining a patient may give you a biased view point. 00:51 Every time you look at the leg, you want to look at it standing and walking. 00:55 You may want to look at it sitting. But don’t look at it in one position. 01:00 When you look at it, you’re not just looking at the architecture. 01:04 You’re looking at the color. You’re looking at the shape. 01:07 You’re looking for any asymmetry, signs of trauma, erythema, any lumpy-bumpiness to the muscles, anything that may draw your mind to something going on. 01:19 Then you want to palpate, palpate initially the bony landmarks, understand the anterior superior iliac spine, anterior inferior iliac spine, as well as the posterior superior iliac spine, and the pubic tubercles, and the ilium, and the ischium. 01:35 You also want to palpate the greater trochanter to understand how the lower extremity fits into the pelvis. 01:42 All of these things are going to be important. 01:44 Then you get to palpating the muscles both the anterior and posterior leg as well as calf muscles to tell you about flexors, the extensors and the movement in the knee. You want to check the range of motion. 01:59 You want to make sure that the hip range of motion is full; the knee range of motion, the ankle range of motion, the toe range of motion are all present. 02:09 Absence of any particular type of activity, whether it be inversion or eversion will affect the entire lower extremity. 02:18 With the knee, while it’s just flexion and extension, it also affects the joint above and the joint below. 02:24 When talking about the ankle and foot, it gets a little bit more complicated because yes, you have plantar flexion and dorsiflexion but you have to worry about abduction and adduction, inversion and eversion of the foot. Those are sometimes tricky because the motion is occurring at places that are tough to palpate. 02:42 We’ll talk a little bit about touching the navicular bone and the sustentaculum tali and the difference spaces where ligaments attach that we treat as areas of importance. 02:54 So, with the lower extremity, with the hip motion, you’ve got flexion and extension, abduction and adduction, internal rotation and external rotation, very similar to the ankle. 03:06 We have plantar flexion, dorsiflexion, abduction and adduction, inversion and eversion. 03:12 The knee, we’re just looking at flexion and extension. 03:15 We’re going to start with the foot because the foot has three separate arches. 03:21 You have a medial and lateral longitudinal arch that come up anterior and posterior. 03:29 You have anterior transverse arch just under the toes. 03:33 Those three arches create the arch of the foot. 03:37 They attach to the ankle through the ankle mortise. 03:43 The ankle mortise have three bones that form a very tight and very specific joint that’s going to help the foot move up and down. 03:53 The knees, you also want to check the bony landmarks, particularly the patellar, as well as the lateral condyles. 04:01 When you move up to the hip, you’re looking at the greater trochanter. 04:04 You’re checking the gluteal folds for evenness, extension, how far it goes out. You want to check the ASIS, the PSIS, the iliac crest, and the anterior inferior iliac spine. 04:17 Getting back down to the foot, one of the main problems you’re going to see and hear about is plantar fasciitis or an irritation of the fibrous tissue that connects the front and back of the foot. 04:29 That gives that arch a lot of its stability that supports the foot, allows sponginess when you come down and support the weight. 04:37 You also want to look at issues related to chronic foot use, everything from skin wear down, skin hardening, skin calluses, things that chronic repetitive stress can do to a foot and affect its functioning. 04:53 The other thing with plantar fasciitis is it can happen from excessive pronation, or just feet that have excessively high arches or arches that are uneven will lead to a plantar fasciitis. 05:08 We’re going to look at the plantar aponeurosis, the connections of the bones that are holding them together, as well as the presence of sesamoid bones that you may be able to feel or note the tenderness when you’re trying to feel it on people. 05:22 When you’re thinking about plantar fasciitis, one-third of patients who have plantar fasciitis will have it bilaterally. 05:27 A lot of that is because patients who have flat feet, fallen arches are more likely to have plantar fasciitis. 05:34 It’s more likely to see a plantar fasciitis in runners, basketball players and volleyball players have a very high risk. 05:42 A lot of people who have plantar fasciitis will develop increased numbers of sesamoid bones. 05:48 You’ll see spurring and pulling and bone formation in areas where the aponeurosis are pulling on the bone like the calcaneus. 05:56 That’s often seen on X-rays. That’s due to calcium deposits along the lines of stress and the increased pressure that’s occurring from the pulling. Again, you’ll see it on X-ray. 06:07 When you evaluate a patient for plantar fasciitis, you’re going to have some localized heel pain. 06:13 You’ll typically be able to palpate it and note the severe tenderness when you touch it. It’s usually worse in the morning and after people have had prolonged periods of rest. 06:23 It’s a clinical diagnosis even though an X-ray will show you tightness of the aponeurosis and may show you the bony formation of the spurring. 06:31 It is still a clinical diagnosis based on your history and physical exam. 06:35 When you’re evaluating for plantar fasciitis, let’s take a runner for example. 06:41 You’re going to ask them about the shoes they wear, the comfort of the shoes and whether or not they notice whether it’s more comfortable in certain shoes or at certain times. 06:51 You want to know the surface they’re walking on, the surface they’re living on. 06:55 Are they standing on carpeting? Are they standing on a hard floors? You want to know how fast they run. 07:01 The faster they run the harder the strike, the more bounciness and more likelihood of developing a plantar fasciitis. 07:07 You want to ask them about their stretching habits, whether they stretch at all. 07:12 You want to ask about the strength of their workout, and the structure of their feet, and what’s going on looking at their arches. 07:20 When we’re thinking about it from an osteopathic perspective, again the body is connected and you're worried about the foot. 07:28 But it does affect the gastrocnemius, the thigh muscles, as well as the hip. 07:36 You do worry about the iliopsoas, the hip flexor, the hamstrings, the biceps femoris, semimembranosus and semitendinosus, the gastrocnemius, and the soleus. 07:47 It’s also important to note that for the foot, the counterstrain points as you can clearly see here are going to be just anterior to the calcaneus and at the bottom of the gastrocnemius embedded in the aponeurosis. 08:01 When you have a patient with plantar fasciitis, self-stretching, self-rubbing is very common. Typically, people would do it of the feet. 08:11 But rubbing the calves and the hamstrings also will help release some of the tension and make people more comfortable. 08:17 OMMs can help increase activity, make people more comfortable. 08:21 We often brace people. We wrap people, splint people, anything that helps them be aware of their proprioceptive sense, of where their foot is, where their legs are, what is going to be uncomfortable so that they protect themselves and don’t overdo it and over work it. 08:38 NSAIDs help prevent inflammation and help prevent the pain from getting worse. 08:43 There’s always a surgical intervention which are not curative, can relieve some of the pain for a short period of time. 08:52 When you look at the osteopathic considerations for treating plantar fasciitis, it’s an osteopathic disease and a concept. 08:59 You have to treat the whole body. We’re going to start treating plantar fasciitis from treating the lumbar spine because when you have problems with the foot, it’s going to extend to the calf, the hips, and the back. 09:13 You want to treat the lumbar spine, the sacrum, and the pelvis. 09:17 Then you want to move distally to the hamstrings, the calf, and finally the foot. 09:22 You do have releases of the plantar fascia which includes rubbing, myofascial release, and counterstrain points. 09:30 The gastrocnemius will become hypertonic. 09:34 It will become tight. It’s going to respond pretty severely to plantar fasciitis. 09:41 When we treat the gastrocnemius, I generally have the patient lie supine. 09:45 I sit at the side of the bed grabbing the gastrocs, both heads of the gastrocnemius, putting my hands on the side under the gastrocnemius trying to separate it because generally you get some ropiness and you are able to separate it. Then I massage them, do some lymphatic pump and just trying to loosen up the muscles. 10:05 I generally put the force on the whole muscle, on the whole body of the muscle loosening up when I get to the aponeurosis because I don’t feel you get much more benefit from that. 10:14 The pressure is maintained the whole time. 10:17 You’re massaging the muscle, and waiting, and measuring, and monitoring the gastrocnemius for a release and for hypertonicity to go away. So you want to do this until you feel some comfort in the patient. 10:35 You feel increased motion. You don’t feel the tightness in the muscle. 10:39 You look to make sure that you haven’t developed asymmetry, if there’s no swelling, no restriction, no tenderness or dysfunction. 10:46 Then I move down to the foot. When I move down to the foot, I generally use myofascial release. Again, having the patient supine and letting me sit at the table and grab the foot and use the foot and initiating motion is generally the most comfortable. 11:03 I use my thumb in order to get enough pressure to push down on it, which often feels very uncomfortable for the patient. 11:09 Some doctors will put an X where their thumbs are so they know they’re keeping it in the same place and know the area of concern and go back to the same place. 11:18 Once you’ve got the foot aponeurosis covered and you’re trying to massage the plantar fascia, you continue with the pressure until you hit a barrier. 11:28 Once that barrier is met, then you’re trying get it released with gentle internal and external eversions, just moving the foot. 11:37 When you do move it and you are able to move it, you will feel some release by the patient and an increased ease of motion. 11:45 You want to repeat both sides because one-third of the time, you’re going to have it on both feet and you want to make sure you monitor and are aware of what’s going on. 11:54 Again, always reassess at the end of a treatment to make sure you can tell what effect the treatment has had. 12:01 If you feel uncomfortable doing myofascial release, strain counterstrain can be done in the foot. 12:06 Again I gave you the two points. 12:09 One of the problems with strain counterstrain is there isn't as much motion in the foot. 12:14 Generally, you find the counterstrain point and then you move the foot until you have that 70% relief of the pain. 12:21 Without much motion you’re going back and forth in the same direction quite a bit. 12:26 But that’s okay. Find the area of ease and then hold it. 12:30 Here are the ankle counterstrain points. One is anterior to the calcaneus. 12:35 When you get that point, you want to flex the forefoot and move it forward until you can feel a release of the pain and the patient says it’s gone down. 12:46 On the medial ankle just inferior to the medial malleolus along the deltoid ligament is another tender point. That’s a tender point that you can hold the medial aspect of the ankle and create the inversion of the ankle until the pain goes away. 13:03 There’s also a tender point on the lateral ankle which is inferior and anterior to the lateral malleolus and the sinus tarsi. 13:12 You want to hold that too. You generally have to evert the foot to get the pain to go away. Again, we’re talking about small amounts of motion. So doing that same motion repeatedly and just adding some plantar flexion and dorsiflexion while you do it may be helpful. The gastrocs point which is just inferior to the gastrocnemius and the aponeurosis is another area I use. 13:39 Even though it's somewhat outside the foot, it does get to the gastrocnemius. 13:43 With plantar fasciitis, a lot of times you’ll do the calcaneal counterstrain. 13:50 We’re going to show you in a video later on how to do a calcaneal counterstrain. 13:55 But I generally have the patient lie supine, sitting at the end of the table. 14:00 I find the plantar fascia and hold it, put my hand over it. 14:05 Generally, the patient's going to be uncomfortable. 14:07 They’re going to tell you that it hurts. When you find the area that hurts, that’s when you start to plantar flex, invert and evert until you find the area of comfort. 14:17 Monitor the tender point with one thumb over the tender point until the patient says they’ve got relief just by positioning and by relieving some of the pressure by plantar flexing and maybe flexing the ankle and finding up the area of ease. 14:33 You may want to suppinate or pronate or go back and forth until you find it and then hold it for 90 seconds. 14:39 I find it hard to hold the foot for 90 seconds in other areas of the body. 14:43 We are looking at easier ways of doing it but have not found it. 14:47 At this point, you do have to hold it for 90 seconds. 14:50 Then afterwards slowly return the foot to a neutral position and then reassess the tender point to make sure you had an effect.
About the Lecture
The lecture OMM Mechanics: Lower Extremity by Tyler Cymet, DO, FACOFP is from the course Osteopathic Treatment and Clinical Application by Region. It contains the following chapters:
- OMM Mechanics – Lower Extremity
- Plantar Fasciitis
- Plantar Fasciitis Evaluation
- Osteopathic Considerations
- Treatment for Plantar Fasciitis
Included Quiz Questions
Which of the following topics should you consider discussing while taking a history when evaluating a patient for plantar fasciitis? (Select all that apply)
- Shoe wear
- Surfaces (standing or exercise)
- Stretching/strengthening history
- Size of the foot
Which of the following are common conservative therapies for plantar fasciitis? (Select all that apply.)
- Stretching of the plantar fascia
- OMM
- Foot wear and inserts
- Night splints
- Surgical plantar fascia release
Author of lecture OMM Mechanics: Lower Extremity

Tyler Cymet, DO, FACOFP
Customer reviews
5,0 of 5 stars
| 5 Stars |
|
5 |
| 4 Stars |
|
0 |
| 3 Stars |
|
0 |
| 2 Stars |
|
0 |
| 1 Star |
|
0 |
